 AgoraVox Italia
Start a WordPress blog or create a free website in seconds. Choose from over 200 free, customizable themes. Free support from awesome humans.
http://www.imhoffpress.worpress.com
Articoli
-
Scott Wilson Got a Second Chance at Life. He Built a Website to Make It Count.
17 marzo, di WordPress.com Staff — Customer Stories, success stories, Website Design, WordPress
A year ago, Scott Wilson’s life was running out of time.
End-stage liver disease. A terminal diagnosis. Two children to raise alone after becoming a widower seven years prior. Every day was an act of sheer will.
Then, on January 13, 2025, the call came. A liver transplant was available.
Scott didn’t just survive. He came out the other side with a mission — to use his story to drive organ and tissue donation awareness across Canada.
He joined the Transplant Advocate Association and became a UHN Foundation Ambassador. Got featured in national media. Went to City Hall to push for April to be recognized as Organ Donor Month in Ontario. And joined a panel working to bring a life-saving organ preservation technology to Canada, one already standard practice in Spain and the UK.
There’s nothing online quite like what I’m building — it’s my perspective, my experience, my voice.

Why WordPress.com
With everything Scott was doing, he needed a home base. A place to document the journey, share his story, and build a platform that could grow into something bigger.
He did his research before choosing a platform. Read consumer reports, went through reviews, and landed on WordPress.com.
Once he was in, he opted for the Website Design Service — a team of experts who build the site for you. Scott had the story, the voice, and the content. The team turned it into a site that actually reflected all of it.
What I appreciate about WordPress is its ability to take everything that I said and mash it up into a saleable product. Who’s going to buy into it? Who’s going to come to it? That’s what I look at.
The site went live without the usual back-and-forth. No glitches, no delays. Scott was surprised by how smooth it was.
It was a leap of faith. But it was a good leap.
What the website does today
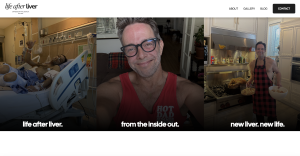
jamesscottwilson.ca is Scott’s platform and his archive. A place to document the journey from the inside out — the recovery, the advocacy, the single parenting, the faith, and the parts nobody talks about.
He’s also using it as a launchpad for a future book and podcast.
It’s a blog, a launching off point for writing ideas. Inspiration for a future book and podcast material.

The site will keep evolving. Scott is the first to say that. But that’s the point.
It’s a fluid, living document. Everything new — new life, new liver, new student. I am living proof that anything can change.

Your story deserves a home, too
Scott’s story is unlike anyone else’s. His website is where he gets to tell it on his own terms.
WordPress.com’s Website Design Service paired him with a team that took his content, his voice, and his vision and turned it into a site ready to go.
He focuses on his mission. The platform handles the rest.
-
How to Generate a WordPress Theme with Telex
16 marzo, di WordPress.com Staff — Tips and Tutorials, Design, Telex, WordPress Themes WordPress theme development has always had a learning curve.
Between PHP, CSS, the template hierarchy, and the inevitable mystery bug that appears unexpectedly, it’s not something most people figure out in an afternoon.
Telex removes that barrier entirely. You tell it what you want, it generates a theme, you install it, and your site has a completely new look.
Here՚s how it works.
1. Ask Telex to create a theme
Start with a prompt. The more detail you include, the closer the output will resemble what you want.
Here՚s an example for a recruitment consultant landing page:
“Create a professional business theme for a recruitment consultant. Clean layout, confident typography, muted color palette with one strong accent color, clear calls to action for job seekers and hiring managers, and a services section above the fold.”
It’s always good to include the visual style, the layout structure, and the purpose of the site.
For example, a recruitment landing page should immediately communicate trust and professionalism, which is very different from the first impression of a portfolio or a blog.
The more context Telex has, the less you will need to correct afterward.
2. Click “Enhance Prompt” before generating
Before generating your theme, click the Enhance Prompt button.
Telex will rewrite your description into a proper design brief, filling in design language, layout structure, typography, and spacing choices you may not have considered.
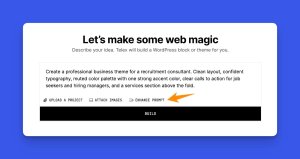
For a recruitment site, that means Telex might add guidance around trust signals, whitespace, and hierarchy that you did not explicitly ask for but absolutely need.
Our updated prompt would include new details such as:
“Use a clean, minimal layout with confident sans-serif typography and a muted neutral palette with a single bold accent color for calls to action. The homepage template should display a hero section above the fold with a headline, subtext, and two prominent CTA buttons: one for job seekers and one for hiring managers. Directly below the hero, show a services section with icon blocks highlighting key offerings such as talent sourcing, executive search, and contract staffing. Include templates for a single job listing, an about page, and a contact page. On the frontend, ensure fast load, responsive design, sticky header with logo and navigation, and a footer with contact info and social links.”
This gives you a much stronger foundation.
3. Alternatively, upload a reference image
If you have a competitor՚s site you admire, a brand mockup, or even a rough sketch of how you want the page laid out, upload it to Telex to guide the visual direction of your theme.
Telex will read the visual and use it as the basis for your theme.
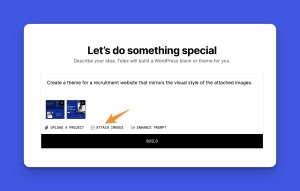
For someone who already knows their brand direction, this is often the fastest route to a result that looks like what they had in mind.
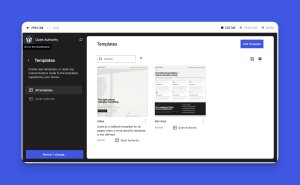
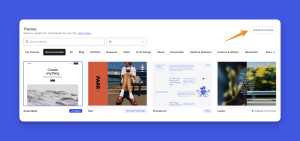
4. Choose from the four variations Telex generates
From here, Telex will give you four variations to compare, each interpreting your prompt a bit differently, with its own take on typography, spacing, layout, and feel.
Opt for the one that feels closest to your brand, your audience, and the impression you want to make. Remember, this is your starting point.

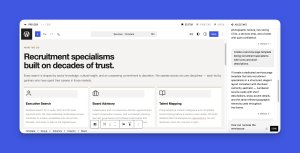
For a business landing page, pay close attention to how each variation establishes hierarchy and readability.
Start with the version that most clearly communicates the value proposition and naturally guides the eye toward the call to action.
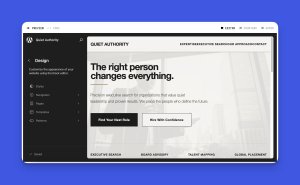
For the recruitment site example, we chose this theme:
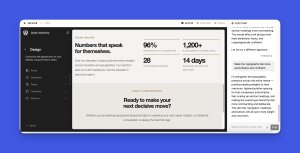
5. Build out the remaining templates
From here, ask Telex to build additional templates for each page type you need.
By default, it starts with a single template that WordPress applies across all your pages, but a complete theme needs different layouts for different content types.
For a recruitment consultant site, for example, you might ask to:
- “Create a services page template with icons and short descriptions for each service.”
- “Create an about page template with a bio, photo, and trust signals such as years of experience and client results.”
- “Create a contact page template with a lead capture form and clear next steps for visitors.”
- “Create a job listings archive template showing open roles with location, salary range, and an apply button.”
Each additional template extends the theme without breaking the visual consistency you established at the start.
6. Refine your theme until it fits your vision
Once the theme structure is in place, iterate on the details — typography, color palette, spacing, mobile layout, dark mode, or whatever else needs refining.
For a recruitment site, for example, you might want the typography to feel more authoritative or the mobile layout tightened up since a lot of visitors may access the site from their phones.
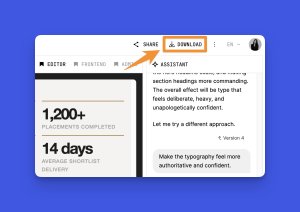
7. Download the ZIP and install it
Finally, click Download, and Telex will package everything into a ZIP file containing your templates, styles, theme.json, and layout definitions.
Take that file to your WordPress dashboard, then → Appearance → Themes → Add New → Upload Theme, then select the file, install it, and activate it.
The moment you activate the theme, WordPress maps your existing pages and content into the new design.
If you already have a services page, an about page, or any job listings set up, they will appear in the new layout without any manual work.
Tip: When you want to update the look later, go back to Telex, make your changes, download a new ZIP, and upload it. When you upload the new ZIP, WordPress keeps your existing content exactly as it is and only applies the new design.
Bonus step: Test your theme on a staging site first
Before activating any theme on a live site, test it in a safe environment first.
For example, WordPress Playground lets you test your theme directly in the browser without installing anything.

You can also use WordPress Studio, a free desktop app that runs a full local WordPress environment on your machine with no server setup required.
Now it’s your turn
Envision a theme, try a prompt you wouldn՚t expect to work, upload a napkin sketch, and see what comes out.
Then come back and show us what you built in the comments!
Keep in mind that Telex is still an experimental tool, so results will vary, and you may encounter the occasional issue. That is part of the process, and every project you release helps determine this tool’s future development.
-
WordPress Studio: New Debugging Tools for Local Development
11 marzo, di Wojtek Naruniec — Changelog, Product Features, Development, WordPress Studio Tracking down bugs in WordPress development often feels like looking for a needle in a haystack. Especially when you’re relying on
var_dump()calls and manually scanning error logs.WordPress Studio has two new debugging capabilities that make this process faster and more intuitive: Xdebug support and debug log access.
Step-through debugging with Xdebug
Xdebug is the gold-standard PHP debugging extension. Instead of scattering debug output throughout your code, you can set breakpoints, step through execution line-by-line, and inspect variables in real time — all from your editor.
This is now available for all Studio users and is powered by WordPress Playground’s WebAssembly version of PHP, which means there’s nothing extra to install or configure at the system level.
Enabling Xdebug
- Select the site you want to debug in Studio.
- Navigate to the Settings tab.
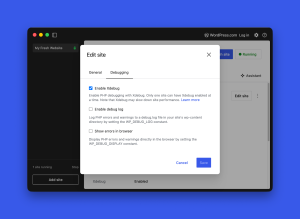
- Click Edit site.
- Navigate to the Debugging tab.
- Check the Enable Xdebug checkbox.
- Click Save.
Studio will restart the site automatically with Xdebug active.
A couple of things worth keeping in mind:
- Xdebug can only be active for a single site: To use Xdebug on a different site, disable it on the currently active one first. The site with Xdebug enabled will display a bug icon in the left sidebar.
- Enabling Xdebug will slow things down noticeably: It’s best to turn it on only when you’re actively debugging.
Connecting your IDE
Once Xdebug is enabled, you can connect your editor and start debugging to find the source of any issues — plugins, themes, or WordPress core. Studio listens for debug connections on port
9003.For the full setup guide, see the Xdebug in Studio documentation.
Easier access to debug logs
Sometimes a full step-debugger is more than you need when you just want to see what WordPress is logging.
Studio now makes that much easier with a dedicated debug log toggle, which sets
WP_DEBUGand WP_DEBUG_LOG for your sites automatically.Enabling the debug log in Studio
- Select your site and click Edit site.
- Open the Debugging tab.
- Toggle Enable debug log on.
- Click Save.
When the debug log is enabled, your local site will capture PHP errors, notices, and warnings to a log file at
wp-content/debug.log. You’ll then see an Open log file link appear in the Settings tab, which opens the log directly — no need to hunt down the file path manually.You can also write your own messages to the log using PHP’s
error_log()function:error_log( 'My value: ' . print_r( $my_variable, true ) );
This is especially handy when you need a quick look at what’s happening during a plugin activation, a hook callback, or a REST API request — without setting up a full debugging session.
Using AI agents to interpret debug logs
Once your debug log is capturing errors and warnings, you can bring an AI agent directly into your debugging workflow. Instead of manually reading through log output and cross-referencing documentation, point your agent at the log and let it do the heavy lifting.
Whether you’re using Claude Code, Cursor, or Codex, the setup is the same: tell your agent that error logs are available at
wp-content/debug.log. From there, it can read the output, identify what’s going wrong, and suggest fixes, all without breaking your flow.Showing errors in the browser
The Debugging tab also includes a “Show errors in browser” toggle, which sets
WP_DEBUG_DISPLAYand controls whether PHP errors are printed directly on the page rather than silently captured in the log.When enabled, fatal errors, warnings, and notices appear inline in the HTML output — useful during active development so you don’t have to keep switching to the log file.
One important note: “Show errors in browser” is best used alongside the debug log, not as a replacement for it. It’s great for quick iteration in your own local environment, but you’ll want to keep it off on any site that’s shared with clients — it can expose sensitive path information or internal logic in the page output.
Better debugging, faster fixes
These two features address different parts of your local debugging workflow:
- The debug log gives you a lightweight way to catch errors and warnings as they happen.
- Xdebug takes it further, letting you pause execution and dig into exactly what’s going on inside your code.
Together, they make Studio a more capable environment for developing and troubleshooting WordPress sites locally.
If you haven’t tried WordPress Studio yet, now is a great time to get started.
-
Monikka Spruyt Left Corporate to Help People Reconnect With Themselves. Her New Website Scales That Mission.
10 marzo, di WordPress.com Staff — Customer Stories, success stories, Website Design, wordpress-com Monikka Spruyt spent years in corporate. Then, the training organization she worked for was being merged into another. She’d also just had her third baby.
She saw it as a sign. Starting over in another corporate role wasn’t what she wanted. This was her moment to build something of her own.
So she backed herself instead.
She trained as a life coach, an EFT (Emotional Freedom Technique) practitioner, and a Reiki healer. She opened Connect Holistic Health — a business built around helping people untangle the noise in their minds and get more out of their lives.
I get to do it on my own terms. My number one hat is mom. And then I run this business in and around that.
Why WordPress.com
Monikka had a website on another platform before. When challenges in the back end of her business gave her reason to pause and reassess, she decided to switch — and go through a full brand refresh at the same time.
WordPress was already familiar. She’d used it extensively in her last corporate role. When it came to choosing a platform for her own business, that hands-on experience made the decision easy.
WordPress was my go-to from my corporate days. I already knew it, I already trusted it.
She could have built the new site herself. But as a sole trader juggling clients, a family, and a growing business, handing the build off just made more sense.
So she signed up for the Website Design Service — a WordPress.com team of design experts who build the site for you. From there, she could easily tweak and add things herself as the business grew.
Having the team build it and then managing it myself? Best time-for-money decision I’ve made.

What the website does today
connectholistichealth.com is Monikka’s primary business hub.
It’s a place for clients to learn about her services, book sessions, sign up for her Reiki membership, register for events, and shop her growing range of wellness products.

The booking and membership setup was exactly what she needed.
I’m using my website as a booking service. Clients find out about the business and book directly through the site.
Clients have noticed too.
I’ve heard from clients that it looks really nice and that it’s easy to navigate.
The e-commerce side has been seamless as well: uploading products and managing the shop structure in the backend has been straightforward.
Something she says is a clear step up from her previous platform.

Next on the list: more products to add to the shop, which Monikka is sourcing and testing herself before they go live.
Your story deserves a home, too
Monikka runs her entire business solo — coaching, energy work, e-commerce, memberships — and her website holds it all together.
WordPress.com’s Website Design Service means she didn’t have to build it alone. The team handled the build.
Monikka brought the vision, the content, and the brand. It was live in days, with fast and secure hosting included.
She focuses on her clients. The platform handles the rest.
-
Is WordPress Secure? (And How to Prevent Security Issues)
5 marzo, di Joe Fylan — Tips and Tutorials, security, WordPress.com At its core, WordPress software is highly secure. The platform itself follows strong security practices and is regularly updated.
Most WordPress security issues don’t come from WordPress itself — but from how a site is set up and maintained.
In this guide, we’ll explain how secure WordPress is, where real risks come from, and what steps you can take to reduce your chances of being hacked.
Is WordPress a safe option for websites?
Yes — WordPress is secure by design. Vulnerabilities in WordPress core are relatively rare and are usually patched quickly when discovered. Security issues occur within the WordPress ecosystem, not the core platform itself.
Most successful attacks exploit:
- Outdated or abandoned plugins and themes.
- Weak or reused passwords.
- Missing software updates.
- Poorly configured or low-quality hosting environments.
Why do people think WordPress isn’t secure?
People think WordPress isn’t secure because it’s widely used, frequently targeted, and transparent about vulnerabilities — not because the core software is weak.
Here’s what contributes to this WordPress myth:
- WordPress powers over 43% of all websites, so it simply shows up more often in security reports and browser warnings than other platforms.

- Issues caused by plugins, themes, or hosting are usually treated as WordPress problems, even though they’re not part of WordPress core. For example, Patchstack, WordPress’s vulnerability database, reported that of 5,948 vulnerabilities, almost 97% were found in WordPress plugins, while the core WordPress software had just 13 vulnerabilities in 2024.
- Security companies like Wordfence run bug bounty programs and publish vulnerabilities publicly. That improves WordPress security, but it also makes those issues easier to notice.
How secure and reliable is WordPress core?
WordPress core software is secure and actively maintained. Security issues in the core platform are relatively rare and typically patched quickly.
WordPress core security is supported by:
- A dedicated security team that reviews vulnerability reports and coordinates responsible disclosures.
- Open-source code transparency that allows thousands of contributors to identify and fix issues.
- Regular security updates, including automatic minor security releases.
- Built-in password strength tools that encourage strong credentials.
Most large-scale WordPress security issues do not originate in core software, but in plugins, themes, or poor site management.
How does WordPress.com further strengthen security?
WordPress core provides a secure foundation. But in practice, many security risks come from how a site is hosted and managed.
WordPress.com reduces those risks by handling key security layers for you.
It includes:
- Built-in two-factor authentication to protect accounts from unauthorized logins.
- Automatic WordPress core updates.
- Free SSL encryption on all sites.
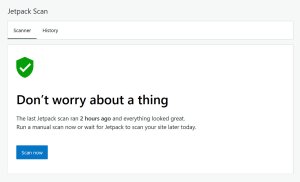
- Daily security scans for plugins, themes, and malware.
- Web Application Firewall (WAF), DDoS mitigation, and brute-force protection.
- Regular platform backups, with real-time backups on Business and higher.
- Activity logging to monitor site changes.
- A dedicated security team supported by a public bug bounty program.
How to keep your WordPress website secure
To keep your WordPress site secure, you need to reduce avoidable risk — the kind that comes from outdated software, weak access controls, and hosting environments without built-in security protections.
Let’s explore the key steps you can follow.
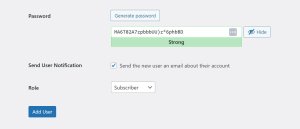
1. Use strong, unique passwords for each account
Create a unique, complex password for each user account. Avoid easily-guessed formats like “password123” which are susceptible to brute force hacking attacks.
Use WordPress.com’s built-in password generator to create strong credentials, and change your password immediately if you receive a suspicious activity alert.
2. Enable two-factor authentication (2FA)
Turn on two-factor authentication to add a second verification step to your login.
With 2FA enabled, logging in requires your password plus a one-time code from an authenticator app or SMS.
Even if someone obtains your password, they won’t be able to access your account without that code.
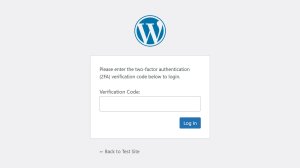
WordPress.com includes built-in two-step authentication. On self-hosted WordPress sites, you can enable 2FA through a security plugin.
3. Review and limit user access
Control who has access to your site and review user roles regularly.
Give each user their own account with the appropriate role. Avoid shared logins, and limit Administrator access to trusted users only.
At least once a month, go to Users → All Users and check:
- Are there accounts you don’t recognize?
- Does anyone have Administrator access who doesn’t need it?
- Are there old contributors or contractors who should be removed?
- Are external collaborators marked correctly?
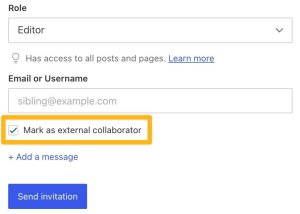
Remove unused accounts or downgrade permissions if full access isn’t required.
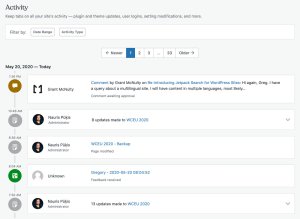
4. Monitor your site’s activity log
Then, check your site’s activity logs regularly to see who logged in, what changed, and when.
If you notice unfamiliar logins, new admin users, or unexpected plugin or settings changes, reset passwords immediately and investigate.
- WordPress.com’s Free, Personal, and Premium plans include 20-event logs, while the Business plan and above feature full logging with Jetpack’s Activity Log.
- Self-hosted sites can install an activity log plugin for WordPress.
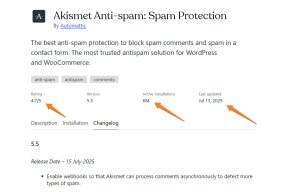
5. Keep WordPress, themes, and plugins updated
Update your WordPress core, themes, and plugins as soon as new versions are released.
It’s essential since outdated software is one of the most common causes of WordPress security issues.
Only install plugins and themes from reputable sources like the WordPress.com plugin directory, prioritize those that are actively maintained, and delete anything you’re not using — inactive plugins and themes can still create risk.
If you’re using WordPress.com, core updates are handled automatically, and the Business plan and higher include managed plugin updates.
Many core features also come built into WordPress.com, so you don’t need to install as many plugins, which lowers your overall security risk.
On self-hosted WordPress sites, you’re responsible for monitoring and applying updates yourself.
6. Enable SSL certificates
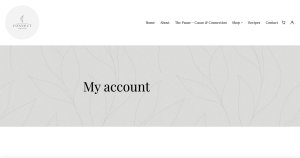
Make sure your site uses HTTPS to encrypt data between your website and your visitors.
An SSL certificate protects sensitive information like login credentials and form submissions. Without it, browsers may label your site as “Not secure,” which can damage trust and expose user data.
You can verify SSL is active by checking for https:// and a padlock icon in your browser’s address bar:

All sites hosted on WordPress.com include a free SSL certificate enabled by default. On self-hosted WordPress sites, SSL must be configured through your hosting provider.
7. Set up reliable backups
Make sure your site is backed up regularly so you can restore it if something breaks or your site is compromised.
Backups allow you to roll back to a clean version after a failed update, malware infection, or accidental change.
Look for solutions that offer automated backups and simple restore options — e.g., the JetPack plugin.
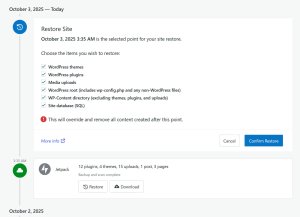
On WordPress.com, sites are backed up at the platform level, and Business and Commerce plans include real-time backups with one-click restores via Jetpack VaultPress Backup.
For self-hosted WordPress sites, you’ll need to install a backup plugin to achieve the same level of protection.
8. Choose secure web hosting
Opt for a trusted WordPress hosting provider with robust security features to ensure a safe environment for your website.
When choosing a web hosting provider, look for:
- Firewalls to block suspicious traffic.
- Suspicious activity monitoring to protect against unwanted login attempts, brute force attacks, and distributed denial of service (DDoS) attacks.
- Daily scans of sites for dangerous plugins, themes, malware, and other vulnerabilities.
- Managed updates that automatically apply the latest patches for WordPress core, plugins, and themes.
- An expert security team that monitors threats and resolves issues as soon as they arise.
On WordPress.com, these layers are built into the platform, with additional security features powered by Jetpack — including activity logging, malware scanning, and real-time backups on eligible plans.
7. Stay informed
New threats emerge all the time, so we recommend keeping up to date on WordPress and website security issues.
You don’t need to become a web security expert. But you can follow the latest WordPress security news and check for issues that may concern your site’s security.
We recommend these sources for reliable WordPress security news:
Ensure your website security with WordPress.com
Out of the box, and at its core, WordPress is highly secure. Vulnerabilities typically come from outdated plugins and themes, insecure hosting, or poor security practices.
According to Patchstack, “vulnerability management and mitigation (coupled with 2FA & session management) remain the most important proactive security measures.”
The simplest way to stay on top of these security habits is to use a hosting provider that handles them for you.
WordPress.com includes built-in protections like automatic core updates, free SSL, firewalls, malware scanning, activity monitoring, and backups — reducing the number of security tools you need to manage yourself.